Best Tips for How to Make Custom Cards at Home
Estimated reading time: 12 minutes
How to make custom cards at home
To make custom cards at home, there are two or three steps depending on what kind of card you want to make. If you want to create a custom card with a photo (for example, a holiday card) you will need to start by choosing or taking a photo. Next you will need to design the card. You can do this using design software you have purchased, or free online software and online design templates you can personalize. Lastly, you need to print out your custom cards. You can do this by printing at home, or having them printed with a custom-printing service. In summary, these are the steps to make custom cards at home:
- Take or choose a photo if you want to make cards with photo images
- Design your cards using software on your computer or online
- Print your cards at home, or use a custom-printing service
Best way to make custom cards yourself
No matter what kind of custom cards you need, Avery products, services, and free tools make it easy to create them yourself. For instance, custom holiday cards. You might be making them for your clients and employee appreciation at the office, or sending them to family and friends.
You can design your cards with free Avery tools and templates online. Then print them on your desktop or office printer. Or, have us print them for you with our WePrint® professional printing service.
In this article we’ll walk you through all the steps to make custom cards on your own using Avery products, services, and free tools. Plus, we’ll answer frequently asked questions about making custom cards at home.
More card resources you might like
- How to Use Printable Business Cards Like an Expert
- 6 Quick Christmas Card Ideas That Will Spread Joy to Your Loved Ones
- 11 Tips for Printing Beautiful DIY Wedding Cards
- 17 Free Printable Cards You Can Personalize
- How to Make Jewelry Display Cards
Can I make custom cards on my computer at home?
Yes! Even if you don’t have any graphic design experience, there are predesigned templates and free printables that you can customize. For example, free Avery card templates can be personalized with your own text, images and more. In fact, you can even learn how to design business cards on your home computer using free Avery software and templates.
Which software do you use to make cards?
Certainly, the easiest software to make your own cards with is Avery Design and Print Online (ADPO). Not only is it totally free, but you can also save your projects in the cloud and access them anywhere when you’re logged into your free Avery account. Not to mention that ADPO is loaded with free predesigned templates that are easy to customize.
You can also make custom cards at home using Avery templates and common desktop software such as MS Word. Or, Apple Pages as well as the Adobe image editing suite (Photo Shop, Illustrator, InDesign, or PDF).
How to find free templates to make custom cards at home
Of course, our gallery of Christmas cards you can personalize is definitely a great way to browse free templates for making custom cards at home. Additionally, our popular blog articles rounding up favorites are also great for browsing. For example, this article full of modern business card designs or this one featuring free printable cards for friends and family.
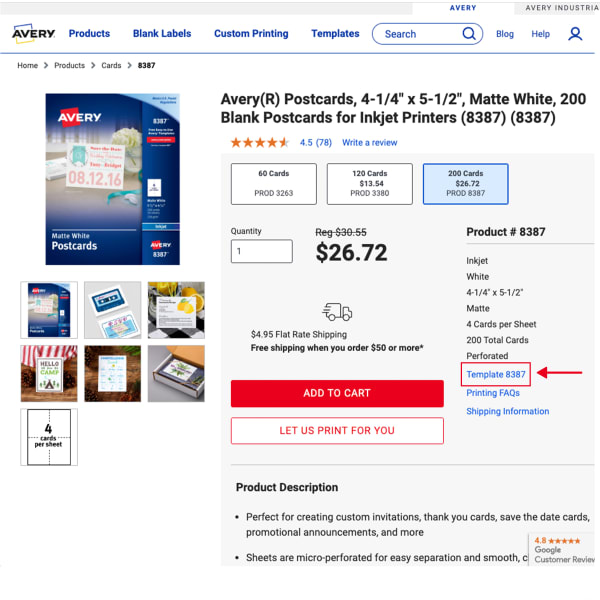
On the other hand, there are several additional ways to find templates for specific Avery products if you have your product number. Firstly, our template finder page which has a search bar to enter your product number. Or, if you already have ADPO open, simply enter it in the search bar there.
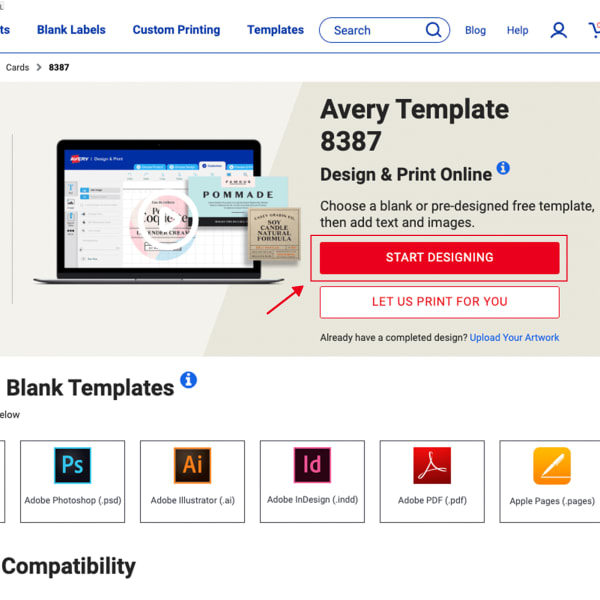
You can also type the product number in the search bar on the Avery website. Then click on the product to view the product page. Once you’re on the product page, click the template link underneath the product feature list. Then click the big red “Start Designing” button. You’ll immediately see a wide variety of predesigned templates and a blank template to design from scratch.
How to turn a photo into a card
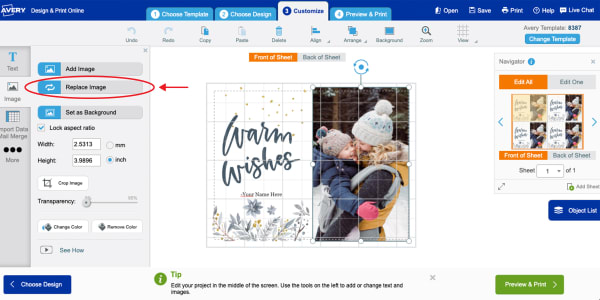
Turning photos into cards doesn’t get any easier than using an Avery template designed just for that purpose. If you have an image in the same ratio as the stock image in the template, literally all you have to do is replace the stock photo with your own. If your photo is a different ratio, crop it to match first and then proceed. Moreover, you can upload photos right from your smart device or computer. In fact, check out this awesome gallery of holiday card designs that you can use to turn any photo into a custom greeting card!
Of course, you can upload an image to any Avery card template to instantly make it a photo card. Once you’ve picked a high-resolution image that you love we have a super helpful video to help you work with images using Avery Design and Print Online. Or, try this help article with images.
Pro Tip: When printing photo cards, inkjet printers are the best option for high-quality printing at home. Otherwise, use WePrint to have them custom-printed for you.
How to print custom cards at home
Here are the individual steps for printing custom cards at home with pictures.
1) Preview & Print
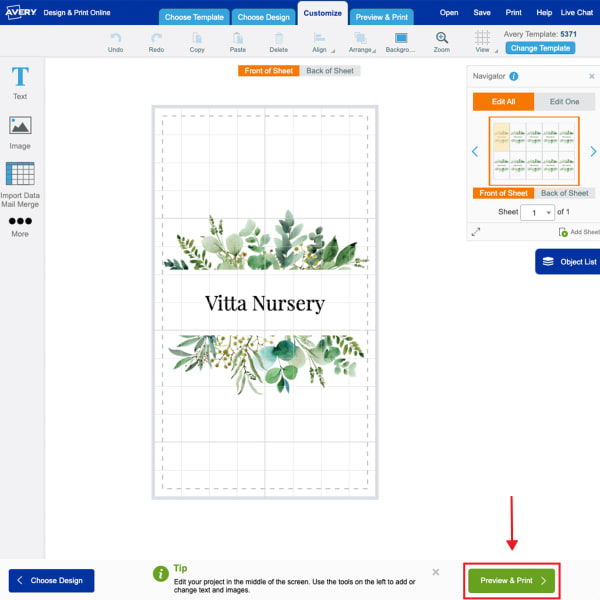
Once you’re happy with your design, click the green “Preview & Print” button.
2) Review the front & back
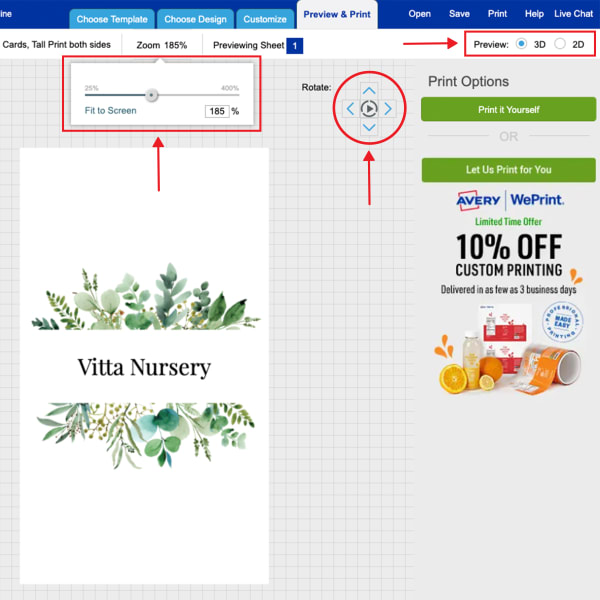
On this screen you will be able to zoom in to review your design closely. You can also rotate a virtual version of the card to view the front and back, or inside if it’s a folded card.
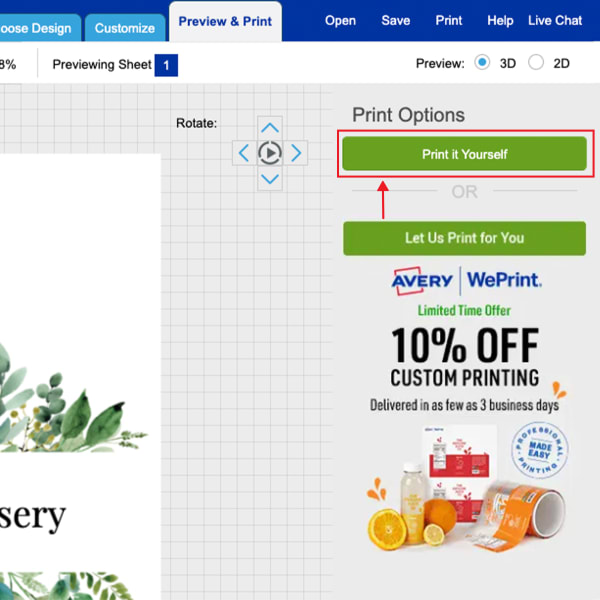
3) Choose print yourself
To print at home choose “Print Yourself” and proceed to step 4. Otherwise choose “Let Us Print for You” and follow the prompts.
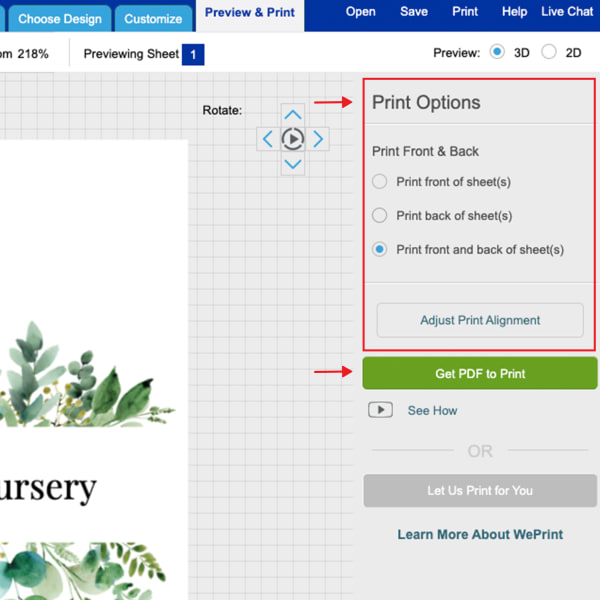
4) Choose print options
Next, you will be prompted to choose some print options. If you are printing on both the front and the back, don’t miss our tips for printing double-sided cards below.
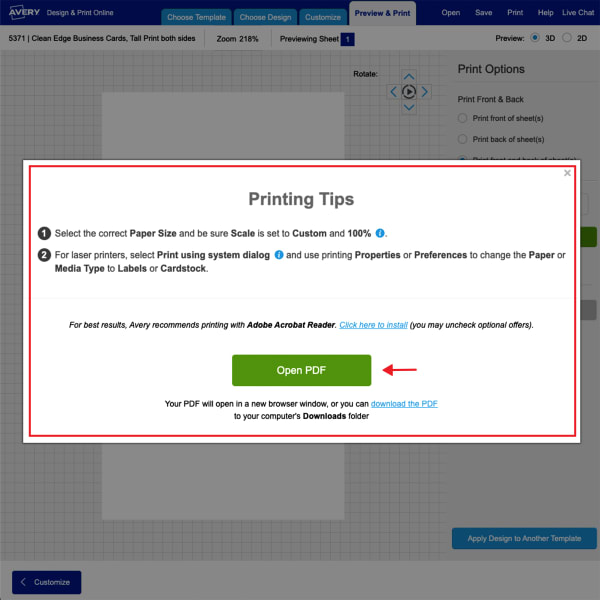
5) Get PDF to Print
Click “Get PDF to Print.” First you will be prompted to save your design for later access. Then a window will pop up with tips and a button to open the PDF.
Opening the PDF may vary between browsers. This video walks you through the steps for printing from different internet browsers.
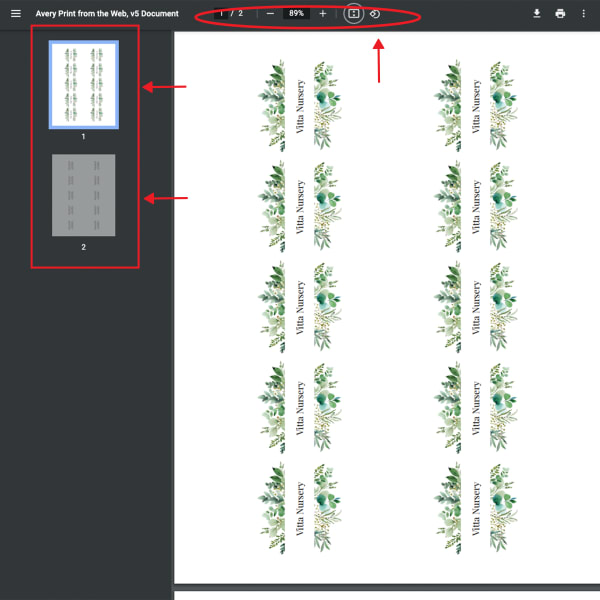
6) Review the PDF
Always review your PDF file before printing. The first preview in step 2 shows you the individual design. The PDF shows you exactly what your whole project will look like.
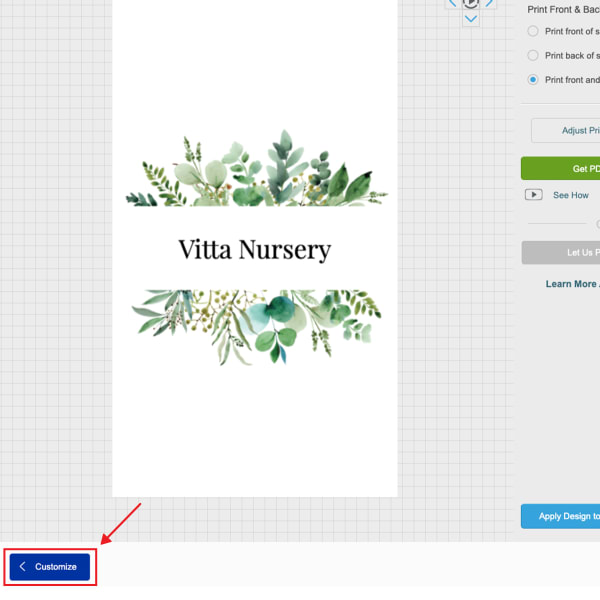
7) Print (or go back to edit)
If you’re not ready to print, use the “Customize” button to continue editing. Remember to review any changes you make in the new PDF file that will be generated.
Printer settings for printing Avery cards
When you’re printing custom cards at home, always set your paper type to “cardstock,” “heavy weight,” or “specialty”. This is important so that your printer can adjust the feed to accommodate sheets that are thicker than regular paper. Additionally, you want to make sure that the scale is set to 100 so that your design prints at the exact intended size and alignment for the card sheets.
Practice printing cards on plain paper first
Whenever you are printing, it’s always a good idea to print a test sheet on plain paper first. One reason to do so is to make sure the sheets are fed in the right direction. To do this, place an “X” on a corner of your test sheet to confirm which way the paper feeds into the printer. This is especially important if you are printing two-sided cards, or cards with printing inside. Another reason is to check alignment. If the scale is off, or the designs go “out of bounds” into the margins, you’ll usually be able to see it right away.
Pro Tip: Place your test paper over your card sheet and hold them up to a bright light to check for alignment between the design and the Avery card sheet.
If your test sheet doesn’t come out right, you can go back and test printer settings until it’s correct. In fact, we have a fantastic help article just for troubleshooting printing issues. However, don’t be shy to call our Customer Care team if you need to! They are happy to troubleshoot with you and walk you through the process.
How do you print double-sided cards?
Many of the steps for printing double-sided cards are the same as printing on one side. For example, you start by clicking “Print Preview” to review your design, then choose “Print Yourself.” Next, choose the option to print the front and back of the sheet, then click “Get PDF to Print.” You will be prompted to save your project, followed by a pop up with printing tips for your browser.
Here is where the process begins to differ. To print double-sided cards you’ll want to click the print icon, choose the printer as usual, but print the front and the back of the card separately. First, change the pages to “Custom” and choose to print page one, which is the front. Review your settings, then print the front of your cards on a plain piece of paper to practice which way to feed the card sheets.
Once you’ve confirmed that the front of your card sheet prints correctly, click the print icon again. This time, change the pages to “Custom” and choose to print page two, which is the back. Then re-feed the test sheet to print the back side. Finally, when you’re happy with both sides of your cards, follow the same process using card sheets instead of test paper. If you’re printing multiple card sheets, print all of the front sides and then all of the back sides.
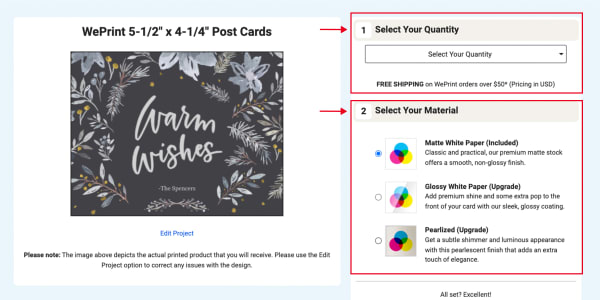
Have your cards custom printed
When you’re finished designing your custom cards, follow steps 1 and 2 for printing at home, then choose the “Let Us Print for You” option. A pop up window will explain that there are two quick steps to check that your design transfers to custom-printed product. Click “I’m Ready,” to proceed. You will be prompted to save your design, then you will be taken to a preview screen where you can zoom in, see the front and back of your project, and view a PDF proof.
Always review your PDF file before printing. The first preview shows you the individual design. Compared to the PDF, which shows you exactly what your whole project will look like. Once you’ve reviewed your project, click “I Approve My Design.” After being prompted to save your project again, you will be taken to a new page to choose your quantity and card material options. Once you’ve made your choices, click “Proceed to Cart” to add the cards to your cart and check out as usual.
Making custom cards at home with Avery printable cards
Making your own custom cards at home is easy when you have Avery products, tools, and services in your corner. The basic steps to making your own cards are:
- Take or choose a photo if you want to make cards with photo images
- Design your cards using software on your computer or online
- Print your cards at home, or use a custom-printing service
Our free online design software and free predesigned card templates are the easiest way to make your own custom cards. Not only can you make custom cards on your home computer, but there are several other benefits. For one thing, you can save projects in the cloud and access them anywhere when you’re logged into your free Avery account. Additionally, you can customize our free templates online, or download versions to use with common desktop software.
In fact, making custom cards is so easy with Avery tools that you can even turn a photo into a card pretty much instantly. Simply upload your photo to one of our predesigned templates for photo cards. No matter what kind of custom cards you’re designing, you can either print them yourself, or use our WePrint service to have them printed for you. And, our help resources, and Customer Care team will be there for you every step of the way.
Do you have a question about designing or printing your own custom cards? Call our Customer Care Team at 1 (800) 942-8379 and we’ll do our best to find a solution for you.


