6 Cute and Easy DIY Easter Ideas Anyone Can Do
Hop into spring and celebrate with cute Easter ideas
Spring is here and everyone is ready to shake off the winter blues. Cute Easter crafts and treats are the perfect way to make Easter celebration extra special. We’ve curated a list of simple Easter Bunny-approved ideas that are super easy to make at home with the kids. So hop to it and try one, or all, of these DIY Easter ideas that are sure to put smiles on your family’s faces.
More articles you might like
- 10 Free Easter Templates for Tags, Cards, and More
- How to Host an Amazing Fourth of July Barbecue
- 5 Mason Jar Gift Ideas You Can Make Yourself

Easter basket ideas for dressing up the classics
Jelly beans and Easter eggs. The two MVPS of Easter baskets. Why not give them a little makeover this year for a refreshed looking Easter basket? If you think you’ve tried every Easter egg design imaginable, it’s time to try block-out dying with stickers. It’s so easy to do and incredibly versatile.
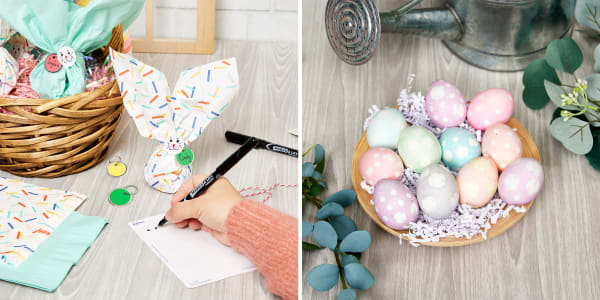
1) Paper napkin Easter goodie bag idea
Supplies:
- Jelly beans, trail mix or your favorite small Easter candy
- Paper napkins
- Blank white 1″ round labels (by the package 5410 / by the sheet 94500 )
- Colorful 1-1/4″ diameter key tags
- Ultra-fine tipped colorful permanent markers
- String/twist ties
- Optional: tablespoon measuring spoon
Instructions:
- Open a napkin and fold on the diagonal. Place approximately 2 tablespoons of jelly beans (or the treat of your choice) in the center.
- Draw bunny faces on your labels (remember to leave enough blank white labels to be the back of each bunny’s head).
- Gather up the napkin into a little pouch with two points sticking out for “ears” and twist.
- Stick a bunny face on the front and a blank label on the back to secure the pouch.
- Finish using string or twist ties to attach a handwritten name tag to each Easter goodie bag.
2) Polka dot Easter eggs hack
Supplies:
- Hardboiled eggs
- Traditional supplies for dying Easter eggs:
- Food color
- Optional: natural dyes
- Vinegar
- 1 cup measuring cup
- Teaspoon
- Jars/cups that hold at least 1 cup water
- Water
- Paper towels
- Mini color-coding dots (1/4″ diameter)
- Optional: small star stickers and/or 3/4″ color-coding dots
- Note: Use the larger 3/4″ dots for more tie-dye looking spots, use the mini dots for polka dots with a cleaner edge
Instructions:
- Make sure your hardboiled eggs are dry and cool to the touch.
- Use color-coding dots to create a polka dot pattern on un-dyed eggs. Gently press to make sure each sticker is stuck in place.
- Optional: you can also use small star stickers (or any other tiny sticker shapes) to create different patterns on your eggs.
- Once you have your stickers in place, dye your eggs as usual using your favorite method.
- When you take your Easter eggs out of the dye bath, gently pat dry with a paper towel.
- Let dry fully, then peel off the stickers to reveal your perfectly polka dotted Easter eggs!
Kids snack pack ideas for Easter day
Special foods are a big part of any celebration. Help make the whole day extra special for kids with cute ways to dress up their regular snacks and lunch. Try these super simple projects to create a little more Easter bunny magic while celebrating at home.
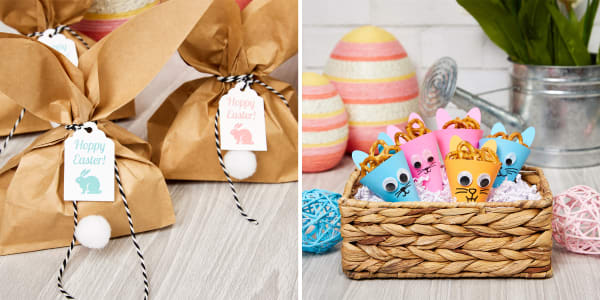
3) Easter Bunny paper sack lunch for kids
Supplies:
- Paper lunch bag
- Tags with string
- Crafting pompoms
- Hot glue or school glue
- Scissors
- Pencil
- Optional: ruler
Instructions:
- Mark a dot about 2 inches down from the top center of your lunch bag. Draw a triangle with point facing down by connecting the dot to each corner of the top of the bag.
- Cut out the triangle and fill the bag with the kids lunch or snacks.
- Print out or handwrite an Easter message on your tags.
- 1 inch below the triangle, twist the bag and secure with a tag on a string.
- Glue a pompom “bunny tail” on the back of the paper bag to complete the Easter bunny look.
To recreate our look, use these templates: blue Hoppy Easter template, pink Hoppy Easter template
On this tag: Printable scallop edged tags with strings (22848)
4) Easter bunny & carrot paper snack cones
Supplies:
- Blank colorful 4-1/4″ x 5-1/2″ postcards
- Bunny cone Easter craft template
- Glue stick
- Assorted color markers, colored pencils or pens
- Tape
- Self-adhesive googly eyes
- Optional: classic googly eyes & school glue
Instructions:
- Print out our bunny cone Easter craft template on several different colored postcards and cut out all pieces.
- Roll the largest cut out into a cone to form a “body” for your Easter bunny. Secure with tape.
- On the front of the cone, draw a bunny face and add googly eyes.
- Use your glue stick to add matching colored bunny ears to the back of the cone opposite of the face.
- Finish with contrasting inner ear pieces glued onto the ears so that they overlap with the inner edge of the cone.
Easy-to-mail Easter crafts for gifting
Just because you’re celebrating at home, doesn’t mean you can’t send Easter wishes to friends and family. These cute Easter crafts are perfect for gifting and are really easy to send through the mail… but the tote bag is so cute, you might need to keep one for yourself!
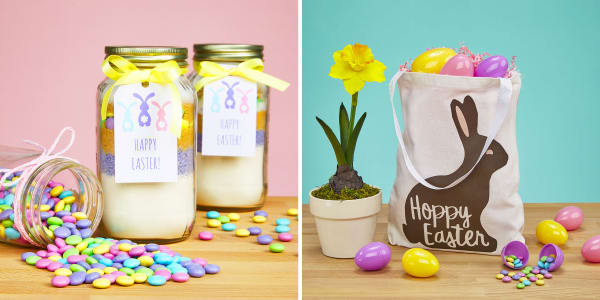
5) Easter cookies mason jar craft
Supplies:
- 24oz Mason jar
- Dry ingredients for your favorite Easter cookies
- Optional: Pastel candy-coated chocolates
- Printable gift tags with strings
- Ribbon
Instructions:
- Add each dry ingredient to your Mason jar, gently tapping to settle contents after each layer.
- Print or write out the baking instructions on a half-sheet of paper, roll it up and push it down into the mix.
- Decorate the front of your Mason jar craft with a pretty ribbon and top off with a festive tag.
To recreate our Easter cookies mason jar craft exactly:
We halved this purple yam cookie recipe, adding in pastel candy-coated chocolates and swapping out half the regular sugar for brown sugar.
Use this template: Bunny Tails Easter tag template
On this tag: 2″ x 3-1/2″ printable tags with strings (22802)
6) Chocolate Easter bunny DIY tote bag
Supplies:
- Blank canvas tote bag
- Chocolate Easter bunny template
- Fabric transfers for light fabric
- Iron
- Scissors
- Pillowcase
- Inkjet printer
Instructions:
- Open our chocolate Easter bunny template and test print on regular paper to make sure it comes out the way you want it. Note: the image will be flipped in print preview.
- Use your iron and follow the instructions for using our light fabric transfers to apply the transfer to your bag.
- When your Easter bunny bag project is completely cool to the touch, slowly peel the backing paper away from corner to corner.
- Enjoy!
Celebrating Easter has never been more delightful, thanks to these charming DIY ideas that add a touch of whimsy to your festivities. From bunny-themed treats to easy-to-mail crafts, we’ve got your Easter celebration covered. But the fun doesn’t stop here—join our community on Instagram and Pinterest! On these platforms, we share even more creative ideas, templates, and step-by-step guides to make your holidays and everyday moments extra special. Hop into a world of endless creativity.

